How to Weave In Ends in Crochet (Step by Step, So They Never Come Loose)
Knowing how to weave in ends in crochet is the difference between a project that looks finished and one that slowly comes apart in the wash. In this step-by-step tutorial you'll learn the simple method that works for almost any stitch, plus how to lock slippery yarn, hide tails as you go and finish amigurumi and colourwork neatly.
Stitch names are in US terms with the UK equivalent in brackets, and every measurement is given in cm and inches. If you're brand new, you may want to finish your first swatch with our crochet for beginners tutorial first.
What you need
- Your finished (or nearly finished) crochet piece, fastened off
- A tapestry needle (also called a yarn needle or darning needle): blunt tip, large eye. A size that suits worsted / UK aran yarn is the most useful one to own
- Small, sharp scissors
- Optional: a crochet hook a size or two smaller than the one you used, for very short tails
A blunt tip matters: it slides between the yarn fibres instead of cutting them. A sharp sewing needle is only useful when you deliberately want to pierce the yarn (see Step 4).
Before you start: three golden rules
- Leave long enough tails. About 15 cm (6 in) is the comfortable minimum. Shorter tails are frustrating to thread and harder to secure.
- Weave on the wrong side, through stitches of the same colour, so nothing shows on the front.
- Never rely on a knot alone. A knot cut right next to the fabric tends to work loose and can show as a bump. Weaving is what makes the end secure.
How to weave in ends in crochet: step by step
Step 1: Leave a tail and thread the needle
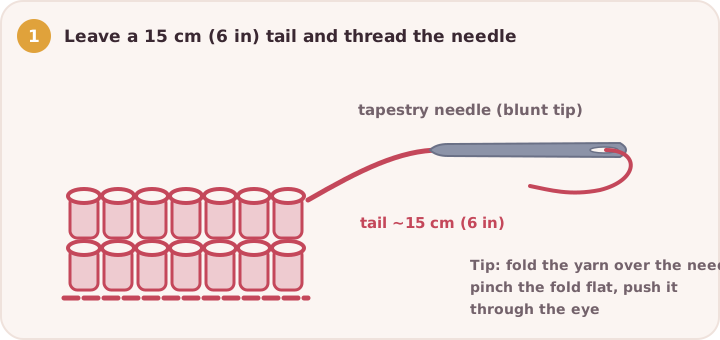
When you fasten off or change yarn, cut the yarn leaving a tail of about 15 cm (6 in). Thread it onto the tapestry needle. If the yarn is fuzzy or splits, fold the end over the needle, pinch the fold flat between your fingers, slide the needle out and push the flattened fold through the eye.
Step 2: Weave through stitches of the same colour on the wrong side
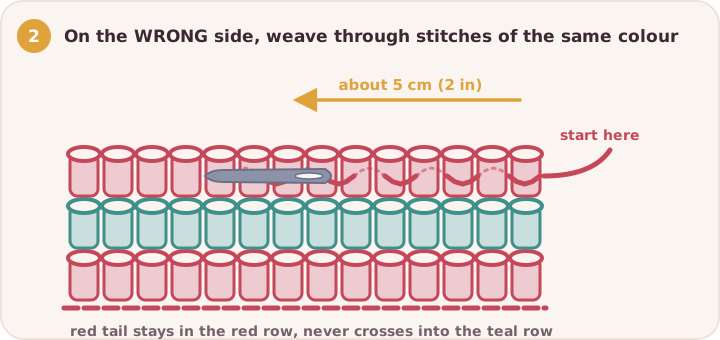
Turn your work to the wrong side. Run the needle through the back loops or the "bars" of the stitches in the same row, going in and out (a gentle zigzag) for about 5 cm (2 in). Stay inside one row and one colour. With tall stitches such as double crochet (UK treble), you can also run the tail up and down through the posts of the stitches.
Step 3: Change direction
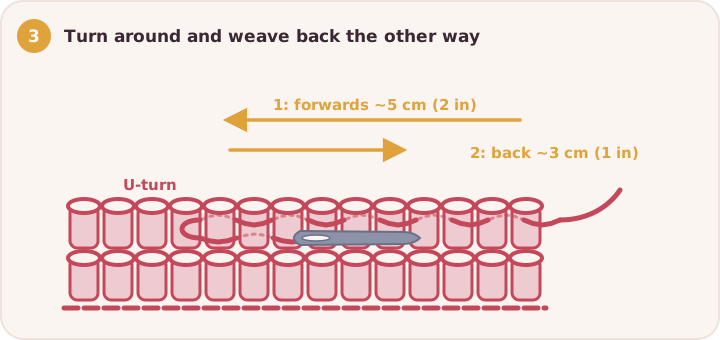
This is the step most beginners skip, and it is the one that stops ends from working out. Skip over one strand of yarn to make a small U-turn, then weave back the opposite way for about 3 cm (1 in), through slightly different loops. Every change of direction creates friction that holds the tail in place. For blankets and baby items that will be washed often, change direction a third time.
Step 4: Lock it by splitting the yarn
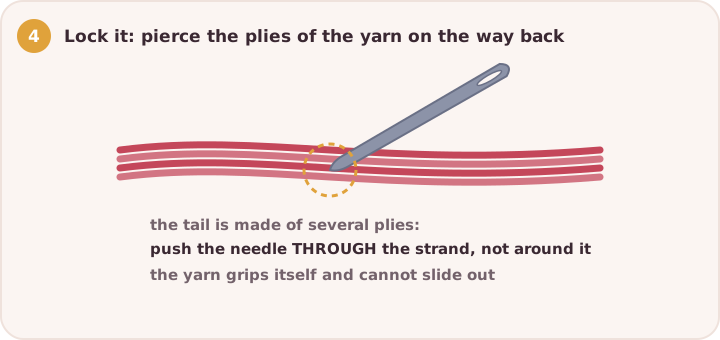
On your last pass, push the needle through the plies of the tail itself (or through the plies of the stitches) rather than around them. The yarn then grips itself and can't slide out. This is especially useful for slippery yarns: mercerised cotton, bamboo, superwash wool and silky acrylics.
Step 5: Stretch the fabric, then trim
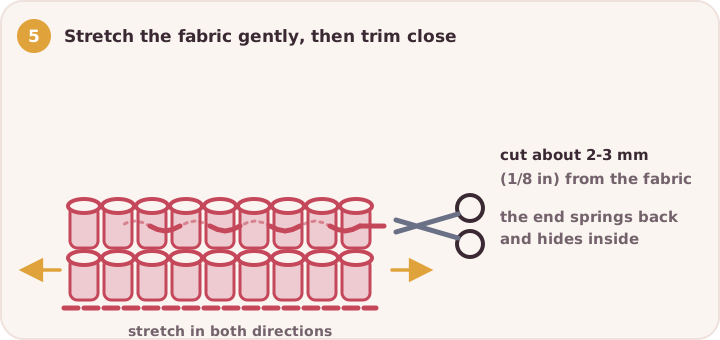
Gently stretch the fabric in a few directions. This lets the woven tail settle to the same tension as the stitches, so the fabric doesn't pucker later. Then cut the tail about 2–3 mm (1/8 in) from the fabric. The tiny end springs back and hides between the stitches. Don't pull the tail tight before cutting, or it may pop back out on the front.
Bonus: crochet over your tails as you go
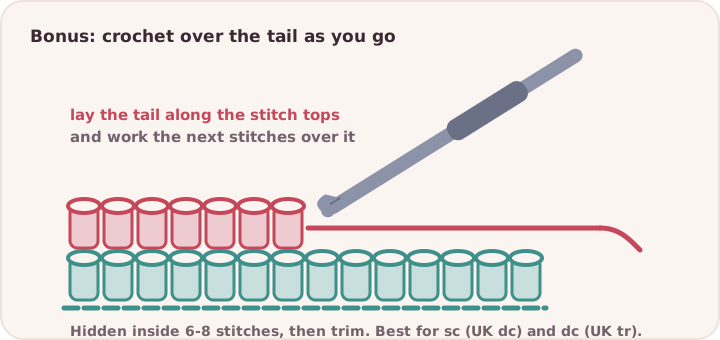
Fewer ends at the finish line? Lay the tail along the tops of the stitches you're about to work, then crochet the next 6 to 8 stitches over it, so it is wrapped inside them. Trim the rest. This works best with single crochet (UK double crochet) and double crochet (UK treble), and it's a big time-saver on striped or colour-change projects and granny squares. For items that get heavy use, you can still run the last bit of tail through a few stitches with a needle afterwards.
Special cases
| Project or yarn | Best way to weave in ends |
|---|---|
| Stripes and colourwork | Weave each tail into its own colour; work along a colour row, not across colours |
| Granny squares | Weave along the back of the round, or crochet over the tails in the next round |
| Magic ring | Weave around the centre, then back the opposite way so the ring can't reopen |
| Amigurumi | "Bury" the tail: push the needle through the stuffed toy and out the other side a few times, then trim close so it disappears inside |
| Blanket edges | Hide tails inside the border or the side edge, where they won't be seen |
| Chunky / bulky yarn | Split the yarn into its plies and weave each half separately in a different direction |
| Lace and mesh | Follow the solid parts (stitch posts and chains) so the tail doesn't cross open spaces |
| Very short tails | Thread the needle into the stitches first, then pass the short tail through the eye and pull |
For the magic ring in particular, see the finishing step in our magic ring tutorial.
Common mistakes and how to fix them
| Problem | Cause | Fix |
|---|---|---|
| Ends poke out after washing | Woven in one direction only | Weave forwards, then back, and split the yarn on the last pass |
| Tail shows on the right side | Weaving too close to the front | Catch only the back loops or bars on the wrong side |
| A different colour shows through | Weaving across colour changes | Keep each tail in stitches of its own colour |
| Fabric puckers | Tail pulled too tight | Stretch the fabric before trimming |
| Hard knot or bump | Knot left in the work | Untie temporary knots before weaving in |
| Tail too short to thread | Cut too close when fastening off | Use the "needle first" trick or a small crochet hook |
Quick recap
- Leave a 15 cm (6 in) tail and thread a blunt tapestry needle.
- On the wrong side, weave about 5 cm (2 in) through stitches of the same colour.
- Make a U-turn and weave back about 3 cm (1 in).
- Split the plies on the last pass to lock slippery yarn.
- Stretch the fabric, then trim close.
Frequently asked questions
How long should I leave the yarn tail? At least 15 cm (6 in). For seams you'll sew later, leave a much longer tail and use it to sew.
Do I need a tapestry needle, or can I use my hook? A needle is easiest and neatest, but you can pull the tail through stitches with a small crochet hook, a few stitches at a time. It's slower but works in a pinch.
Should I weave in ends as I go or at the end? Either works. Weaving as you go saves a long, boring session at the end; weaving at the end lets you undo rows without fighting woven tails. Crocheting over tails is a good middle ground.
Can I just tie a knot and cut the yarn? Not on its own. Knots can slip loose and leave a bump. If you tie a temporary knot to hold two tails together, untie it before you weave in.
How do I weave in ends on a temperature blanket or other multi-colour project? Crochet over the tails each time you change colour, or weave them in regularly so they don't pile up. Our temperature blanket guide has more tips for big colour projects.
Looking for more?
- How to change colors in crochet
- Magic ring crochet tutorial
- How to crochet a granny square
- How to crochet in the round
- How to crochet for beginners
Key takeaways
- Leave tails of at least 15 cm (6 in) and use a blunt tapestry needle.
- Weave on the wrong side, through stitches of the same colour.
- Always change direction at least once; that's what keeps ends in.
- Split the yarn on the last pass for slippery or washable yarns.
- Stretch the fabric before trimming, and never rely on a knot alone.